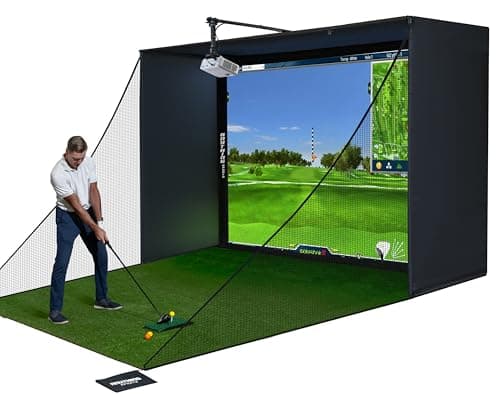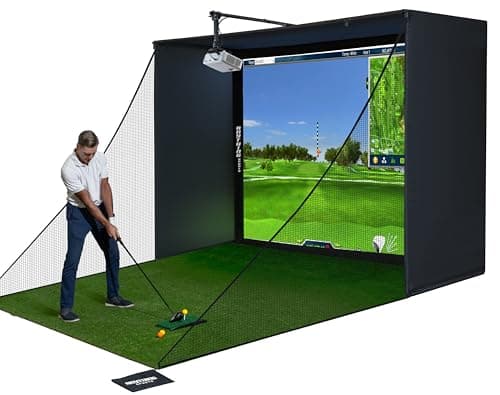

Detailed Overview
An enclosure like this only becomes a real golf simulator once it's paired with the other pieces of the system, and understanding that division of labor helps set expectations before you unbox anything. The frame, blackout cage, and impact screen form the physical bay: the structure that catches the ball, blocks ambient light, and gives you a surface to project onto. The built-in projector mount is part of that structure, positioned to hold a compatible projector above or in front of the screen so you're not drilling into a ceiling or sourcing a separate mount bracket. But the enclosure itself is hardware-agnostic. It's built to work with a range of third-party projectors, launch monitors, and simulator software rather than being tied to one ecosystem, which means the actual "brains" of the simulator, the projector, launch monitor, hitting mat, and often turf, are chosen and supplied by you. The Oxford blackout cloth and cage matter here too, since a dim, contained room does more for image contrast and shot containment than the screen alone. Where this setup tends to run into friction is room fit: ceiling height, depth, and general clearance around the frame need to be measured against the enclosure's footprint before assembly, and it's built around home and garage use rather than the heavier framing you'd find in a commercial hitting bay.
Specifications Explained
The numbers on the spec sheet matter more than they look at first glance. The overall footprint, roughly 8'4" wide by 5' deep with a 60 inch length and 102 inch width, tells you how much floor space to clear before ordering: this is not a corner accessory, it needs a dedicated section of garage or basement. The black finish is mostly cosmetic, keeping the enclosure visually neutral against most garage or basement backdrops.
Setup & Installation
Assembly is generally straightforward: the frame poles and connectors go together without special tools, and most reviewers describe going from box to practice session quickly. The built-in projector mount is a genuine time-saver, since it eliminates a separate ceiling installation. That said, tensioning the bungee cords evenly across the screen's grommets can be fiddly, and a few installers find the overall size and weight awkward to maneuver alone. Because this is a full enclosure rather than a compact net, measure your garage or room carefully first: limited ceiling height or depth will make the cage feel cramped once it's up. Large shipments can also arrive with handling damage, so inspect components before assembling.
Compatibility
The frame comes with a built-in projector mount, so there's no need to source or install a separate ceiling mount for your projector. Coverage across reviews describes the setup as hardware-agnostic: it's meant to work with a range of third-party projectors, launch monitors, and simulator software rather than locking you into one brand or ecosystem. That flexibility comes with a tradeoff worth noting: the projector, launch monitor, hitting mat, and sometimes turf aren't included, so you'll need to supply and integrate those pieces yourself. Because it's an enclosure first, room fit matters too; ceiling height and floor depth in your garage or practice room will determine how comfortably everything comes together.
Real-World Considerations
Real-world feedback on this package is a bit thin on individual detail: most of what's available comes from expert roundups rather than a large body of individually quoted buyer comments, so any pattern here should be read with that caveat. Where the enclosure does show up in review aggregators, it's flagged as one of the more frequently reviewed products in its category, which points to generally positive reception overall, though the specific comments behind that reception aren't broken out in the sources available.
Two practical themes do recur across the coverage. First, buyers need to plan and budget separately for a projector and a hitting mat or turf, since neither ships with the enclosure despite what promotional photos sometimes imply, that's an extra sourcing step worth accounting for before you order. Second, room fit is a genuine consideration: because the frame has fixed dimensions, reviewers caution that smaller garages or multipurpose rooms with limited ceiling height or depth can feel constrained once everything is assembled. Measuring your space in advance is the sensible move.
Alternatives Worth Considering
If you already own projector mounting hardware or plan to build your own frame, a bare screen-and-frame kit without the built-in mount could save money, since this package's mount is a feature you'd otherwise pay extra for elsewhere. On the premium end, higher-priced enclosures exist for buyers who want to spend more than this value-priced setup, though the trade-off there is cost rather than a documented difference in capability. For anyone assembling a simulator piecemeal, this enclosure slots in easily alongside a DIY build, so it's worth considering if you already have a launch monitor, mat, or projector picked out and just need the screen and cage. Conversely, if you want a single purchase that includes the projector and hitting surface too, look at bundles marketed as fully complete, since this one leaves those two items for you to source separately.
Buying Advice
This enclosure suits you if you already own or plan to buy a launch monitor and projector, since the kit is built to pair with third-party gear rather than lock you into one brand. Before ordering, measure your garage or room carefully: adequate ceiling height and floor depth are essential for safe swings and proper assembly, and the listing doesn't spell out exact dimensions, so confirm clearance against your own space rather than assuming it fits. If you're set on 4K projection, the screen is rated for it, but you'll need to supply that projector yourself. Plan to spend a few extra minutes tensioning the bungees evenly across the grommets during setup, since uneven tension is the main cause of a sagging screen. Anyone hitting real balls at speed should find the screen built to hold up to that use.
Considering it? Check the price of Complete Golf Simulator Enclosure Package – 4K-Ready Impact Screen with Blackout Cage, Projector Mount, Frame Poles, Side Shank Nets | Indoor & Garage Practice | Easy Setup | 12-Month Warranty
$799.99 on Amazon
Frequently Asked Questions
Is the impact screen actually 4K-ready?
Yes, the screen is built and rated for 4K projection, so pairing it with a 4K projector gets you a genuinely sharp, detailed image rather than a marketing label attached to a screen that can't back it up.
Does the package come with a projector included?
No, this is an enclosure kit, not a complete simulator. The frame, cage, and screen are designed around you adding your own projector afterward, so budget for that piece separately.
Can I use a projector I already own with this setup?
Yes, the enclosure is built as an add-your-own-projector system rather than a fixed proprietary unit, so most standard projectors that meet your resolution needs should work fine once mounted.
Editorial Verdict
Taken as a whole, this package earns its recommendation as a practical, no-fuss way to build a home simulator bay. The bundle of screen, blackout cage, projector mount, poles, and side netting removes the guesswork of sourcing parts separately, and the tool-free assembly means most owners can be hitting balls within an afternoon rather than wrestling with instructions. The 4K-ready screen and light-blocking enclosure genuinely elevate the experience over a bare screen setup, and the frame holds up under repeated impacts when properly stabilized. The catch is that you still need to supply your own projector, launch monitor, and hitting surface, and you need a room with real depth and ceiling clearance before ordering. For anyone with the space and a plan for those extras, it's a sound, sensibly priced foundation rather than a compromise.